Pages

Tuesday, May 26, 2015

Silhouette Matching Book

 
To create this activity, I used a canvas book and some little treasures found around the home.

 
I traced an item on each page and colored it in with a fabric marker to create silhouettes.

 
I was so curious to see how my daughter (26 months) would take to this book.

 
She really liked playing with the clothespin pictured above (I included two different types in the basket for her to examine and compare the differences.)

 
There are a few pages in the book where she needs to examine objects for details before choosing the right fit. Here is one example of a circular silhouette with many round objects to choose from... 


This particular silhouette had four tiny holes in the middle. She will need to find the circular object in the basket that matches.


After trying a few items, she found the button is the correct match.


This is one of my favorite activities I've ever made for the kids.

Depending on the age you're targeting, bind your book with metal rings or ribbon.  
 
How would you create your book? Here are some ideas:
  • Use your book to teach attention to detail
  • Use it as a language building book
  • Use little shapes/animals/numbers for matching
If you create one of your own, please share.
Enjoy!

Thursday, May 21, 2015

Fostering Independence

  "Free the child's potential, and you will transform him into the world." - Maria Montessori
 
 
My daughter has always shown interest in learning how to do things herself. I love identifying and creating ways to help her easily complete tasks in our home that would otherwise be difficult. The joy on her face when she is able to do things on her own is contagious!

 
A water spout in the fridge provides the opportunity to get a drink of water on her own. Yes, there are spills ....

 
She carefully carries the full glass of water to her wash table.


She grabs her own towel to dry the floor. She knows how to do this herself by observation and imitation.

 
I encouraged her to throw the dirty floor towel down the clothes chute. This is another task she loves!

 
Back to the table for a refreshing drink of water.

 
... and back for more:)
 
This is the wash table located in our kitchen:
 
The table allows the kids to easily access towels and dish cloths for clean-up.

 
On top of the table are the towels and a bowl of soapy water. The bottom shelf holds a pitcher for refilling the wash bowl.
 
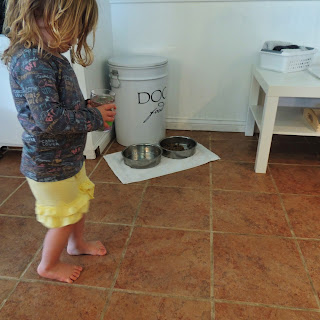
My children enjoy helping care for our dog. They scoop and fill the food bowl, but have always had difficulty filling the water bowl. The pitcher on the bottom shelf also offers an opportunity to fill the dog's water bowl on their own.
 
 
Next to our wash table is the children's cupboard. It allows them to get their own utensils, plates, cups, bowls, snacks, etc.
 
 
When my daughter turned two, we adjusted her closet so she could pick out her own clothes. We did this by simply adding a low tension rod in her closet and hanging a mirror on her wall.


When she was only 15 months we placed a low mirror in our bathroom so she could see herself. She is able to see what her face looks like before it needs to be cleaned up, or what her nose looks like when it's runny and needs to be wiped. She can see herself in the mirror when she combs her hair, has an ouchie, etc. etc. etc... I want my children to have the opportunity to experience these things with all of their senses if/when they want to.

 
She has her own drawer in the bathroom. I like to add new things (usually from the dollar store) to make getting ready a little more exciting.

 
The bathroom cupboard holds all of my children's bathroom needs so they are within reach: toothbrushes, cups, washcloths and a bowl for washing up. Hanging on the side of the doors are their morning/night time routines.
 
 
When my son was 2 we added labels to the drawers in his room. We only use those within his reach. The labels allow him to see what's inside each drawer, and help him identify where his clothes belong when we put away laundry.


Tuesday, May 19, 2015

Love Letters To My Children - Playing Mailbox

I found a little mailbox at Goodwill last winter for $1.00. I thought it had great potential for the kids with the lock and key and the little mail slot.
 
I picked up some rectangular wood slices at the craft store and started by writing little love letters on them to my children. Some from me, some from my husband and I, one to "mail" to their new baby sister, and one to receive from their favorite cousins.
 
I "mailed" one to my daughter ... then invited her to the mailbox to open it.

 
She couldn't wait to use the key!
 (And, if you know me, I'm just loving her focus and fine motor development.) 


She saw something inside and with a giggle, she reached in to grab it.

 
We looked at the note together. I pointed to her name on the front, then my name. We looked at the back and as she touched the words as I read to her, "I love you!" She looked at me with a smile, scooted over to me and gave me a big hug. My heart is so full.

 
My 2 yr old needs her mail to be simple. Since we're focusing on name recognition with her, she just has her first names on the front of hers. My 4 yr old wants to learn everything and is into reading, so his mail includes much more detail.

 (I blurred the info in the photo.)
 
Now that I know these wood slices are a great fit and the kids enjoy them, it's back to the craft store to get more. I plan to paint my next set with chalkboard paint so they can make their own and reuse them over and over again.
 
How do you play with mail?

Monday, May 18, 2015

Flashlight Sight Words in the Bathtub

Once upon a time my little boy, 3 yrs old, was obsessed with his flashlight. He played with his flashlight all day long and slept with it at night; and we couldn't leave home without it.

Night after night, he wanted to bring his flashlight into the bathtub. Submergible flashlights were not worth the price to me, so this is what we did ....

 
I wrote sight words on the inside of the tub with bath crayons and my husband wrapped the (Dollar Store) flashlight in 4 plastic baggies, sealed with scotch tap. When the bath was drawn, we turned out the lights, invited our son in, and the rest was up to him.
 
He really liked finding the words, especially the ones he was very familiar with.
 
 
Naturally, I loved it when he'd find a word and read it himself. However, I didn't want to push him to do this as it would take away from the fun.
 
What would you play with? Shapes? Letters? Colors?
 
Best of all ... you don't need to have a flashlight to play:)

Teaching with Push Lights

I created this game a while back for my son to help him learn his sight words. He was very into flashlights at the time, so I thought he'd be interested in these push lights. Here's how we played:
I took sight words (from the Bob Books we were reading) and simply wrote the words on note cards.
 
Using three words and three lights, I would call out a word, he would point/read that word and then hit the corresponding light.
 
 My daughter was showing a lot of interest in this while we were playing. She wasn't close to reading (at 23 months), but she did enjoy sandpaper letters. Here's a picture of how she played:
I would call out a letter sound, and she would hit the light and then trace that letter.
Sometimes she would just hit the light that corresponded with the letter without tracing, and sometimes she'd get so excited that she'd just hit all three lights. Either way, she seemed to enjoy playing this game more than her brother!
 
My daughter is now 26 months and we're playing this game with sandpaper letters and now sandpaper numbers. My son on the other hand isn't interested in this like I thought he would be. He does love the game Zingo for sight words and begs to play this often before bed.
 
You can play too - and it doesn't have to be words, letter or number learning. What are you working on now with your own children that you could think of playing this with?

Thursday, May 14, 2015

DIY Montessori lowercase letter play - Lu 26 months

I wanted to create an activity to play off two of my daughter's current interests: piggy banks and letters.
 
Here's what I came up with: 
 
All materials were purchased at Michael's. The wooden disks, the box (without the slot), the letters and the tray. Thankfully, when this idea came to me, I already had most of the materials on hand ...  just needed to purchase the stickers.
 
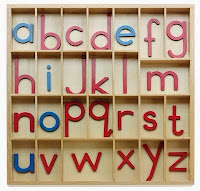
The consonants are red and the vowels blue to resemble our Montessori moveable alphabet. Here's a picture of what ours looks like: 
 
What's great about Lu playing with this game I created is that it also doubles up as an extension to her letter work. Playing with these discs helps her to gain exposure to new letters through play.
 
 
So far Lu  knows a, s, t, m, o, p and h letter sounds. I set them out when I introduced this activity to her.
 
Here you can see her pointing to the A, saying "aeh."
 
What I didn't know, until we played with this last night, is that she also knows K and identified it as "kuh" when she found it in the bowl. She seemed so proud!

 
This was made for play, so I'm allowing her to explore and continue to show me her interests. If she holds a letter up and looks to me for the sound, I tell her. Otherwise, this is her play and she shows me the way:)

 
I love how this game helps her develop those fine motor muscles she'll be using soon for writing!

 
As much as she enjoys putting the letter discs into the box, she also seems to enjoy opening the box and dumping them into the bowl.
 
I plan to make a few more with numbers 1-10. For inspiration, you could add stickers or draw on them to teach:
 
shapes
colors
animals
numbers
 
Enjoy! And, please let me know what you think.

Wednesday, May 13, 2015

Capital Letter Play - D 4 yrs old

Capital Letter Play
 
The materials in this game were created a few years ago for my nieces. See how we played Here
 
The letter disks and burlap have been sitting in our storage room ever since due to extreme lack of interest. I'm happy to have finally found a use for them.
 
This game came to me as I was making a wooden coin box [pictured] to help my 2 yr old "play" with her lowercase letter sounds (post to come). All I needed was to cut the burlap into squares and find something in the house for rolling. 
 
Here's how to play:
  1. Roll the cube to see what letter it falls on.
  2. Find the matching letter disk and place it into the coin slot.
  3. Write the letter down on paper. (These are the points.)
  4. Repeat with the next player until all of the letters have been played.
  5. Add total letter points to see who wins.
A few notes:
When the cube lands on an empty circle, pass to the next player.
If the letter landed on has already been played, pass to the next player.
 
 
Have Fun!!